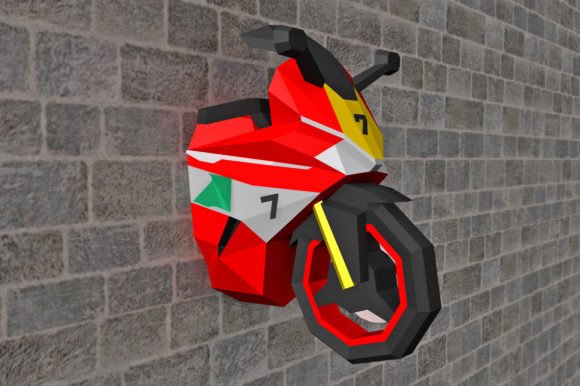
DIY 3D Sports Bike Papercraft Wall Art
There is a distinct satisfaction in transforming a flat sheet of paper into a tangible, three-dimensional object. This process bridges the gap between digital design and physical craftsmanship, offering a unique way to decorate spaces without the high cost of traditional sculpture or metalwork. The DIY Sports Bike Wall Art - 3d Papercraft project exemplifies this blend of precision and creativity. It is not merely a model kit; it is an exercise in patience, geometry, and artistic expression that results in a striking centerpiece for any room.
For creators, designers, and hobbyists aged 20 to 50, this project offers more than just a weekend activity. It provides a versatile asset that can be adapted for home decor, educational demonstrations, or even small-scale product prototyping. The appeal lies in the accessibility of the materials combined with the sophistication of the final result. With an assembled size of 50 x 28 x 36 centimeters, the sports bike commands attention without overwhelming a shelf or desk, making it an ideal scale for urban living spaces or office environments.
The Intersection of Digital Files and Physical Craft
The foundation of this project is the digital file set, which typically includes PDF, EPS, DXF, JPG, and PNG formats. This variety ensures compatibility with almost any workflow. Whether you are using a standard home printer for the PDF templates or a laser cutter for the DXF files, the source material is designed for flexibility. The inclusion of vector formats like EPS and DXF allows graphic designers to modify the templates, perhaps resizing specific components or altering flap structures to accommodate different paper weights.
What makes this approach particularly useful is the low barrier to entry. You do not need expensive machinery. The requirements are humble: a colored printer, glue, scissors, a craft knife, a scorer or bone folder, a non-working ballpoint pen, a ruler, and A4 or Letter cardstock paper. Despite the simplicity of the tools, the engineering behind the templates is robust. The tabs and slots are calculated to interlock securely, ensuring the structural integrity of the bike once assembled.
The assembling time is estimated at two hours. This duration is significant because it represents a "flow state" activity. It is long enough to disconnect from digital distractions and focus entirely on the tactile process of cutting, scoring, and gluing, yet short enough to complete in a single sitting. For freelancers and entrepreneurs who often struggle with burnout, this focused manual labor can serve as a effective mental reset.
Creative Applications Beyond Home Decor
While the most obvious use for DIY Sports Bike Wall Art - 3d Papercraft is as a decorative item, its utility extends far beyond hanging on a wall. Educators can utilize these templates to teach principles of engineering, spatial reasoning, and geometry. The process of converting a 2D net into a 3D form is a powerful visual aid for students learning about surface area and volume. Furthermore, the requirement to score and fold along precise lines teaches fine motor skills and the importance of accuracy in manufacturing.
Marketers and small business owners in the automotive or lifestyle sectors can leverage this craft for experiential marketing. Imagine a pop-up event where attendees assemble their own miniature versions of a new motorcycle launch. The tactile engagement creates a deeper emotional connection to the brand than a simple brochure ever could. The finished models serve as memorable takeaways that occupy physical space in the customer's home, acting as a constant reminder of the brand.
Interior designers and stylists also find value in papercraft for staging photoshoots. Unlike heavy resin or metal props, paper models are lightweight and easy to transport. They can be painted, textured, or distressed to match specific aesthetic themes—from gritty industrial lofts to sleek, modern minimalism. Because the base templates are available in digital formats, a designer could theoretically print multiple units in varying color schemes to create a dynamic installation art piece.
Mastering the Assembly Process
To achieve a professional-looking result, the preparation of materials is just as critical as the assembly itself. The choice of paper is paramount. Standard printer paper is too flimsy to hold the shape of a 36cm long vehicle. You must use cardstock, ideally between 200gsm and 250gsm. This weight provides enough rigidity to maintain the curves of the bike's fairings while still being flexible enough to fold without cracking.
The scoring process is where amateurs often falter. Using a ruler and a non-working ballpoint pen or a dedicated bone folder, you should gently indent the fold lines before attempting to bend the paper. This breaks the fibers slightly, allowing for a crisp, sharp edge rather than a rounded, messy crease. When cutting out the pieces, a sharp craft knife is superior to scissors for internal details and straight edges, ensuring that the tabs fit perfectly into their corresponding slots.
Gluing requires patience. Apply adhesive sparingly to the flaps. Too much glue can warp the cardstock or seep out onto the visible surfaces, ruining the finish. It is advisable to work in sections—perhaps starting with the chassis and wheels before moving to the body panels. This modular approach keeps the project organized and prevents the frustration of trying to reach inside a nearly completed structure to attach a small component.
Customization and Personal Expression
One of the greatest strengths of this medium is the potential for customization. While the digital files may come with pre-colored textures, printing them on white cardstock opens the door to endless variations. Artists can hand-paint the models, applying custom racing liveries, matte finishes, or metallic effects that printers cannot replicate. This transforms the project from a simple assembly task into a genuine art creation.
For those who prefer a monochromatic look, printing the templates on black or kraft paper creates a sophisticated, shadow-box effect. The interplay of light and shadow on the faceted surfaces of the low-poly design adds depth and drama to the piece. Additionally, the digital nature of the files means you can scale the project. By tiling the print across multiple sheets of paper, you could create a massive floor-standing sculpture, or shrink it down for intricate jewelry displays.
Maintaining Quality and Longevity
Once assembled, preserving the integrity of your DIY Sports Bike Wall Art - 3d Papercraft is essential. Paper is susceptible to humidity and dust. To protect the finish, consider applying a clear sealant spray. This not only guards against moisture but also stiffens the structure further, preventing sagging over time. Displaying the piece in a glass cabinet or under a cloche can also shield it from environmental factors while highlighting it as a prized object.
Organization during the build process also dictates the final quality. Keep your cut pieces sorted by assembly stage. Losing a small tab in a pile of scraps can halt progress and lead to improvised fixes that compromise the look. A clean workspace with good lighting is not just a recommendation; it is a necessity for precision work.
Ultimately, this project is about the joy of making. In an era of mass-produced goods, creating something with your own hands carries a unique weight. Whether you are a designer looking for a quick prototype, a parent seeking an engaging activity, or an individual wanting to add a personal touch to your walls, the journey from digital file to physical object is rewarding. The resulting sports bike is not just a model; it is a testament to your skill, patience, and creative vision.
If you encounter challenges during the process or have ideas for modifications, remember that the crafting community is vast and supportive. Questions about paper types, adhesive choices, or painting techniques are always worth exploring. The flexibility of the PDF, EPS, and DXF files ensures that the project can evolve with your skills, offering new possibilities with every build.